 |
| Group shot of the happy family complete with pets |
Monday 26 March 2012
Necrons, Games Workshop - Family Protrait Part 9 of 9
Saturday 24 March 2012
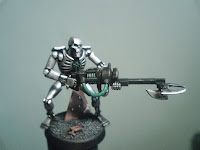
Necrons, Games Workshop - Part 8 of 9 Scarab Swarms
The first part of the Necrons project Scarab Swarms is now complete and I'm making decent progress with the main figures. Hopefully these should be finished by the end of the week (if I can stay out of the local beer garden, with all this sunshine).

These little ankle bitters were easy to paint up. Primed with black then block painted with Chainmail leaving the low areas black and then highlighted with Mithril silver. Then, using the GW washes added shadow and 'dirt' stains.


These little ankle bitters were easy to paint up. Primed with black then block painted with Chainmail leaving the low areas black and then highlighted with Mithril silver. Then, using the GW washes added shadow and 'dirt' stains.

Friday 23 March 2012
Necrons, Games Workshop - Part 7 of 9
A couple of close up shots. Along with the ‘officer’ figure this is my favourite figure. You can tell when a figure ‘works’ or not and I think this one does. He looks menacing and there is enough tension in the piece to attract attention plus I enjoyed scratch building the side arm.

Last figure to be completed.


Last figure to be completed.


Thursday 22 March 2012
Necrons, Games Workshop - Part 6 of 9
Last but not least, this is the final figure which I was 'forced' to modify. I made the left arm from spare plastic sprue.
The right hand and base of the gun was taken from a spare ACW arm. At first I made the gun in the style of a double barrel shotgun but this didn't 'look' quite right so I stuck another two barrels on top. Again this looked too basic. Seeing a circular moulding on a sprue I thought this could look like an ammo magazine case. I decided to place the case on top to look like an old Gatling gun rather than underneath like a Thompson sub-machine gun.


This set is now more or less complete. The only thing left now is to fit the green plasma barrels and finish with a protective varnish.
Wednesday 21 March 2012
Necrons, Games Workshop - Part 5 of 9
Thinking that I’d very nearly completed painting and constructing the Necron figures (see below), I was a bit taken aback when I realised that there was an arm missing. Well two really. One that I’d used to create a modification by cutting off a hand to use on another figure and the other arm went missing after I’d dropped my parts box. Ho hum. This means that I will have to cut and carve another right hand. I’ve found a spare set of plastic arms (holding a musket) from a Perry ACW mini that I think I can use.


Tuesday 20 March 2012
Necrons, Games Workshop - Part 4 of 9
In order to create an effect of a plasma gun GW provide twelve plastic rods (that appear florescent green) rods which form the barrow of the weapon. Several of these rods split when I was removing them from the various sprues. One broke clean in two and looking awful when I super-glued it back together. Slightly depressed and not knowing what to do as an alternative, I stared at the sprue for a few minutes. Then I noticed that one long side of the spruce was free from markings so I cut a section out and thinned it down to match the others. Surprisingly the plastic didn’t look too bad. It then occurred to me that I may be able to use the same material to create a light-sabre type weapon to replace the sword I had planned for another figure. First I removed the hand and handle from one plasma gun and then made a pistol from various different square and round section plastic rods.
A replacement handle was cut out from plastic card. To achieve the correct look with the plasma gun for the light sabre figure I simply cut away the right hand and hollowed out the handle.

A replacement handle was cut out from plastic card. To achieve the correct look with the plasma gun for the light sabre figure I simply cut away the right hand and hollowed out the handle.
Monday 19 March 2012
Necrons, Games Workshop - Part 3 of 9
I mocked up one model to represent an officer figure. I have to work on the right arm and tweak the hand of the left arm (to make it left handed!). I might replace the sword with a light-sabre type weapon.


Looks a bit like Eddie of an Iron Maiden album cover.


Looks a bit like Eddie of an Iron Maiden album cover.
Friday 16 March 2012
Necrons, Games Workshop - Part 2 of 9
To make this figure stand out a bit more I've altered the pose slightly. The left leg has been cut at the hip and the knee and then pinned at a different angle to enable the foot to rest on the block. I may reverse the arm holding the weapon from right to left so the arm is resting on the knee.


Another more obvious addition will be to add a couple of extra blades to the end of the weapon; a Gauss Flayer apparently.


Another more obvious addition will be to add a couple of extra blades to the end of the weapon; a Gauss Flayer apparently.


Thursday 15 March 2012
Necrons, Games Workshop - Part 1 of 9
In my youth I would often see how quickly I could complete a model, the faster the better I thought. Nowadays I spend a bit more time planning ahead. Some of this is simply mentally picturing how to complete the minis, a mental dry run. Without wishing to sound odd I can often ‘see’ the finished article before I start, or at least have a very good idea how it will look. It’s a pity I can’t rapid prototype using my mind power alone.


An example of this process is the Necron miniature bases. From the start I had wanted to give the notion of the Necrons walking across a scarred industrial wasteland. I had assumed that all of the miniatures were made up of identical parts until I came to prepare the bases. Checking the figures again I was pleasantly surprised to discovery that there is a large amount of variation possible. With several arm options and separate bodies every model can have a different pose.


An example of this process is the Necron miniature bases. From the start I had wanted to give the notion of the Necrons walking across a scarred industrial wasteland. I had assumed that all of the miniatures were made up of identical parts until I came to prepare the bases. Checking the figures again I was pleasantly surprised to discovery that there is a large amount of variation possible. With several arm options and separate bodies every model can have a different pose.


Raiding the scrap box enabled me to produce a number of special ‘one off’ bases. The figure standing on the crushed and twisted structural steel section is a good example. This was made from standard plastic ‘H’ section heated over a candle and then flattened into shape with a metal needle file. Interesting odd shaped bits of plastic were used to replicate distressed metal. Using thin plastic rod I cut half a dozen small pieces to equal length and then scattered them to replicate spent shell cases. Small scale metal chain and plastic card complete with 'bullet holes' and rust stains will add to the overall look of desolation. Reminds me of a foundry I worked in once.

One criticism I have of this box set is that the bases supplied are way too small for these figures (20mm dia). Or to be more pedantic, the legs of the figures are too widely spaced. If one foot is placed firmly within the circular base then the other foot almost entirely clears the edge. Both feet will overhang the edge if not positioned carefully leaving, in my opinion, not enough contact to secure them properly. In order to be safe I decided to pin all of them. This is a relatively easy, if a little long winded, procedure and gives the mini a little extra stability. I used a hand drill to produce a small blind hole, the same diameter as a paper-clip, into the ‘foot’ of the miniature. Then cut off a suitable length of paper clip. Bend the metal into a loop with a longer length of metal at ninety degrees to the loop, pass this though the plastic base and glue the miniature into position.
Monday 12 March 2012
Alumwell Wargaming Show (WMMS) 2012
Last Sunday was an unusually warm and bright spring day here in the sunny West Midlands. So what better way than to spend a few hours before the local pub's beer garden opens than to look at (and buy a fair few) hundreds and thousands of figures and models. Sad but true. This is the closest event to where I live (exactly ten miles according to Google). The venue, oddly called 'Aldersley Leisure Village' is actually a modern sports hall just to the north east of Wolverhampton. Parking is free if you can find a spot. I also got to meet up with Pensnett Model Makers Society, who I hadn't managed to see at all this year due to personal and financial reasons.
A number of games caught my eye but in my buying frenzy I forgot to take more photos. Here are a few of the ones I did remember to take.
Shrewsbury Wargames Society always put on excellent terrain This always appeals to my model making interests.
Wyrley Retinue's 30 Years War Battle of Steinkirche,
In no particular order here's list of what we purchased (and I don't think this is even a complete list):
Knuckleduster Miniatures - '1812 The American War' range:
Canadian Voltigeurs,
Glengarry Light Infantry,
Glengarry Light Infantry Command,
US Frontier Militia Officers,
US Frontier Militia Musicians and Flagbear,
US Artillery Crew,
Gen Brown & Colonial Gardiner,
US Mounted Colonels
Baccus 6mm Franco Prussian War:Bavarian Infantry Booster Pack
Imperial French Infantry Booster Pack
Western Europe Large House
Crooked Dice:Timelift Security (not Captain Scarlet)
Federated Security (not Federation troops from Blake's Seven)
The Men from Tomorrow (not the Prisoner)
Fireforge Games:
Teutonic Knights (hard plastic box set)
Trent Miniatures:
Prince Rupert
Perry Miniatures:Yorkist command & Warwick on foot,
Liveried Billmen,
Men at arms/Knights standing with polearms,
Pack of Bills,
Mercenaries WoTR box set,
Woodland Indians Stockbridge tribe
Foundry Miniatures:Mean Machine (2000AD
Torquemada (2000AD)
Tech Judge (2000AD)
Fink Angel (2000AD)
Chief Judge McGruder (2000AD)
Menacing Monsters:
Allosaurus
BattleFlags:
Saye and Sales Regimental flag
Paints:
Various horse colours
Navy Blue
I wouldn't normally list purchases but I'm curious how many of these projects I'll complete (or even start) before next years show.
For more (and better quality) photos take a look that these sites.
Belisarius show report - I had actually recognised Belisarius from the latest issue of Battlegames that I had received the previous day. His figures feature on the cover. I'm afraid I must have given the poor chap the impression I was a mad stalker.
Will's Wargaming Blog
28mm Heaven
News from the Front
I did actually take more photos but I'll be posting these eventually onto the Pensnett Model Makers Society blog page.
A number of games caught my eye but in my buying frenzy I forgot to take more photos. Here are a few of the ones I did remember to take.
Shrewsbury Wargames Society always put on excellent terrain This always appeals to my model making interests.
 |
| Shrewsbury Wargames Society |
 |
| Shrewsbury Wargames Society |
 |
| Shrewsbury Wargames Society |
 |
| Shrewsbury Wargames Society |
 |
| Shrewsbury Wargames Society |
 |
| Shrewsbury Wargames Society |
 |
| Wyrley Retinue's Battle of Steinkirche |
 |
| Wyrley Retinue's Battle of Steinkirche |
 |
| Wyrley Retinue's Battle of Steinkirche detail |
 |
| Wyrley Retinue's Battle of Steinkirche detail |
Knuckleduster Miniatures - '1812 The American War' range:
Canadian Voltigeurs,
Glengarry Light Infantry,
Glengarry Light Infantry Command,
US Frontier Militia Officers,
US Frontier Militia Musicians and Flagbear,
US Artillery Crew,
Gen Brown & Colonial Gardiner,
US Mounted Colonels
Baccus 6mm Franco Prussian War:Bavarian Infantry Booster Pack
Imperial French Infantry Booster Pack
Western Europe Large House
Crooked Dice:Timelift Security (not Captain Scarlet)
Federated Security (not Federation troops from Blake's Seven)
The Men from Tomorrow (not the Prisoner)
Fireforge Games:
Teutonic Knights (hard plastic box set)
Trent Miniatures:
Prince Rupert
Perry Miniatures:Yorkist command & Warwick on foot,
Liveried Billmen,
Men at arms/Knights standing with polearms,
Pack of Bills,
Mercenaries WoTR box set,
Woodland Indians Stockbridge tribe
Foundry Miniatures:Mean Machine (2000AD
Torquemada (2000AD)
Tech Judge (2000AD)
Fink Angel (2000AD)
Chief Judge McGruder (2000AD)
Menacing Monsters:
Allosaurus
BattleFlags:
Saye and Sales Regimental flag
Paints:
Various horse colours
Navy Blue
I wouldn't normally list purchases but I'm curious how many of these projects I'll complete (or even start) before next years show.
For more (and better quality) photos take a look that these sites.
Belisarius show report - I had actually recognised Belisarius from the latest issue of Battlegames that I had received the previous day. His figures feature on the cover. I'm afraid I must have given the poor chap the impression I was a mad stalker.
Will's Wargaming Blog
28mm Heaven
News from the Front
I did actually take more photos but I'll be posting these eventually onto the Pensnett Model Makers Society blog page.
Friday 9 March 2012
Dark Angel Space Marines, Games Workshop
I realise this is cheating slightly but I will be transferring posts from my other blog page, Ubique SciFi, on to this blog and then closing the old one down. There are a couple of reasons for this; it gives me something to do blog-wise and I have a few more sci-fi figures in the pipeline. I'll be tweaking the posts slightly so they make more sense. Apologies if you're already seen this:
Over the new year I was invited over to deepest, darkest Shropshire by my mate Ade to admire his new man cave. He later kindly gave me a spare box of Space Marines Combat Squad to play around with. Seeing as one of his latest projects is a Space Marines Dark Angels army for Games Workshop’s 40K I decided to paint these up to complement his figures. I considered making these miniatures straight from the box, well more or less, but as usual I couldn’t resist modifying them. I would class these as ‘soft’ modifications as they involved only minor changes and I only used parts that came in the same box.
As the models come with several accessories including knives and ammo packs, from the start I wanted to have one figure wielding a knife. This was another easy mod, simply cutting the knife handle to fit on to the hand. As the left arm and hand is designed to hold the bolter I cut and carved the hand and rotated it in the process so that it held the other spare knife at a more natural angle.
Naturally this left me with a spare bolter. As the bolters are not supplied with carrying straps I thought they might be magnetised (or whatever is in appropriate in the year 40,000) to fit against the leg. So using the same line of thought as the helmet solution I stuck the bolter to the right thigh. It seems to fit and looks ok.
You actually get seven head options in the standard box. Five normal helmets, one of the older style and one helmet-less head. Thinking about the figure with just the bare head I thought where and how would he store his helmet? Remembering images of soldiers during the modern Gulf Wars, I recalled that they stored gasmasks on their upper left leg. This seemed practical so I decided to replicate this on the model and stuck the spare helmet on to the figure’s left thigh.
The helmet lying discarded on the base surrounded by spent cartridges is based on that of the Dark Angels 2nd Company, known as the Ravenwing. The older style helmet, black with a central red vertical stripe, I believe is based on the original metal space marine model from way back in the 1980’s. I spotted one of these on display at Warhammer World at the GW headquarters in Nottingham.
I cut and carved two of the left knee pads on the figures so that they matched the other models. With hindsight I should have left one and painted the whole lower leg with company colours and made him an NCO type character.
The models are painted in Citadel’s paints. Primed black the main body of the miniatures were painted Dark Angel Green (naturally) and simply washed with Babab Black ink and then highlighted with mix of Snot Green and Goblin Green. The colour schemes are all based on the official Games Workshop Dark Angel Codex.
In order to maintain some continuity I’ve kept the bases similar to the ones I used on the Necrons detailed previously.
The actual chapter icon transfers supplied with the set proved difficult to apply due the curved nature of the shoulder pad. I had to slice the transfer in order in ensure that it could lie flat.
"miniatures©Games Workshop. All rights reserved. Used without permission - models painted by Matthew Perks". (Just in case any GW lawyers are reading this!)
Over the new year I was invited over to deepest, darkest Shropshire by my mate Ade to admire his new man cave. He later kindly gave me a spare box of Space Marines Combat Squad to play around with. Seeing as one of his latest projects is a Space Marines Dark Angels army for Games Workshop’s 40K I decided to paint these up to complement his figures. I considered making these miniatures straight from the box, well more or less, but as usual I couldn’t resist modifying them. I would class these as ‘soft’ modifications as they involved only minor changes and I only used parts that came in the same box.
 |
| “Never bring a knife to a gunfight? Why not bring both!” 3rd Tactical Squad, 4th Company, Dark Angel Chapter. Brother Boaz |
 |
| 3rd Tactical Squad, 4th Company, Dark Angel Chapter. Brother Boaz |
 |
| 3rd Tactical Squad, 4th Company, Dark Angel Chapter. Brother Boaz |
 |
| 3rd Tactical Squad, 4th Company, Dark Angel Chapter. Brother Boaz |
Naturally this left me with a spare bolter. As the bolters are not supplied with carrying straps I thought they might be magnetised (or whatever is in appropriate in the year 40,000) to fit against the leg. So using the same line of thought as the helmet solution I stuck the bolter to the right thigh. It seems to fit and looks ok.
You actually get seven head options in the standard box. Five normal helmets, one of the older style and one helmet-less head. Thinking about the figure with just the bare head I thought where and how would he store his helmet? Remembering images of soldiers during the modern Gulf Wars, I recalled that they stored gasmasks on their upper left leg. This seemed practical so I decided to replicate this on the model and stuck the spare helmet on to the figure’s left thigh.
 |
| 3rd Tactical Squad, 4th Company, Dark Angel Chapter. Brother Ahab |
 |
| 3rd Tactical Squad, 4th Company, Dark Angel Chapter. Brother Micah |
 |
| 3rd Tactical Squad, 4th Company, Dark Angel Chapter. Brother Hiram |
 |
| 3rd Tactical Squad, 4th Company, Dark Angel Chapter. Brother Seth |
The models are painted in Citadel’s paints. Primed black the main body of the miniatures were painted Dark Angel Green (naturally) and simply washed with Babab Black ink and then highlighted with mix of Snot Green and Goblin Green. The colour schemes are all based on the official Games Workshop Dark Angel Codex.
In order to maintain some continuity I’ve kept the bases similar to the ones I used on the Necrons detailed previously.
The actual chapter icon transfers supplied with the set proved difficult to apply due the curved nature of the shoulder pad. I had to slice the transfer in order in ensure that it could lie flat.
Subscribe to:
Posts (Atom)