Friday 29 May 2015

My Heroine - A real Inspirational story

Not a hobby related post but one I'll hope you'll read anyway. 'Inspirational' is an often overused word but please take a minute to read my friend's story as 'inspirational' hardly seems adequate.

Please click on the link to read her full story, one that still manages to move me to tears:

After my father very nearly died (we were told on three separate occasions by various medical staff that he wouldn't make it through the night) following a 'routine' kidney operation went wrong (no operation is really routine, despite what people may say) my perspective to my friend's experience was particularly biased.

I'm not asking anyone to donate any money to the designated charity (although if you can it would of course be great appreciated). I will however ask that, if you feel you are able, please consider registering as an organ donor. Stating the obvious, the difference you could make is often the difference between life or death for the patient. My (very) minor part in the story made me appreciate just how much hard work is involved for everyone involved, from the family to all the staff at the QEII in Birmingham.

I'm extremely thankful to a complete stranger, the donor, and just as importantly the family who gave their consent and thus gave my friend a second chance at life. They will never know just how grateful we are for their act of kindness and for that simple fact alone I'll ask you to please consider registering as an organ donor. 

Thanks.

Wednesday 27 May 2015

Lion Rampant - Demo Game - Battle Report


This is a link to a quick demo game played between an old friend Ade and myself, recorded last Sunday. We played with just a few units to demonstrate the core mechanics of the game. Any mistakes in the gameplay are entirely my fault.

Tuesday 26 May 2015

Small WoTR Medical Vignette, Perry Miniatures

This small vignette was the result of a challenge I set myself one night whilst I was staring at a pile of Perry's plastic WoTR figures (yes, I do need to get out more). With hindsight I purchased two more boxes than I actually need to build a couple of basic retinues using the Lion Rampant ruleset,  although in my defence I hoarded all this lot years ago. 

After successfully altering around a dozen figures featured in previous posts I wondered just how far I could go. One figure in particular struck me that could altered to depict someone lying down. My original thought after seeing that model was to have a prone figure (implying being wounded) soldier receiving medical treatment. The model serves no natural function for any game that I can think of, it is more of an exercise in how far I could modify the figures.
Deciding to commit myself I cut away the bases, always a nerve wracking 'point of no return'. Then looking at the arms I used an standard archer's pair, removing the bow and cutting off the hands so that they could be rotated to form a more natural looking posture when the figure was lying flat. With the angle of the right arm I thought I could imply that the prone figure was trying to prop himself up by his elbow.

As the prone model's right foot was left at an odd angle I cut this part off and replaced it with greenstuff. His left foot was cut and then rotated so that it looked more relaxed.
The second (kneeling) figure involved a lot more chopping and changing. Both legs were cut through at the knee and upper thigh. I should have used a paperclip to form a frame to hold the legs in position but I just smothered the pieces in glue and hoped that they got stay in place (sometimes I annoy myself with my lack of planning). Once dry greenstuff was used to fill in all the gaps. The arms are from the standard trumpeter arms with, obviously, the trumpet cut away. Fortunately the arms naturally looked as if the kneeing figure was either to administer the last rites or is about to offer comfort to the prone soldier.

The sword was made by cutting away the surface detail off the scabbard and smoothing down the plastic. The helmet was hollowed out using a craft knife and hand drill. The arrow was cut away from the standard bundle that comes with the archers.

The following images don't match up but it might help people see how the figures were altered.

Thursday 21 May 2015

Modified WoTR Foot Men-at-Arms WIP, Perry Miniatures - Part 10 of 10

This figure will eventually represent Lord Dudley but it wasn't my original intention to use this actual miniature. I had always planned on having three matching figures for both my mounted and foot miniatures but as a result of poor forward planning on my part (never one of my strengths) I literally ran out of matching parts for the mounted figureThe figure that will now represents one of Dudley's sons should have been the main man himself. The barbute helmet wasn't my first choice either but I was left without further options. I'd like to claim that this figure is based on the the famous Avant armour on display in Glasgow (images here) but it's just a coincidence. At least it will help the figure stand out among the others wearing the more common sallet variety. 

As I was running out of options for a figure wearing full harness I realised that I would have to make an alternative so I used the same standard body but decided to make the foot figure match the mounted knight.
As far as I can gather the wearing of tabards became quite old fashioned towards the end of the C15th. but I wanted to paint Lord Dudley's heraldry onto the figure (Dudley himself was relatively old when the wars started). This meant I could use standard arm pieces but I would have to modify the upper body to make it look as if he was wearing a tabard over his harness. To do this I used a sharp (i.e. new) scalpel and removed all the detail from the belt upwards such as the stomach and back plates. Once this was smoothed out I then added greenstuff below the belt line to look like material covering the upper part of the tassets (thigh armour). Once this part had cured I added the belt detail using greenstuff.

For the left arm I removed the knife from the standard arm piece and then left the figure on my work bench. I find it's sometimes best to leave figures like this to one side so you can occasionally just glimpse it once in a while. Mistakes or unnatural poses will soon become evident because they will become more and more obvious when you look at them. Although pleased with the results so far I wanted the figure to really stand out more than the others so added the small buckler.

Now I'd like to claim that I did all my research first and then only commit to butchering..sorry, modifying a plastic figure to suit but this is not always the case. As mentioned above I adopted my usual approach and left it to one side to ensure that it 'looked ok'. After a while one detail kept on drawing my eye was the length of the tabard, with me now thinking that I'd given Lord Dudley a mini -skirt. The seeds of doubt were sown after I remembered seeing the brass of William Catesby in St. Leodegarius's Church, Ashby St Leger (it was one of his descendants that organised the GunPowder Plot and which may have been organised in a nearby room next to the churchyard). This brass shows Catesby wearing a close-fitting short-sleeved tabard which is considerably longer than my version and covers half of his thigh. This seemed to confirm my suspicions but before I started mixing up more greenstuff I thought I would just double check to see if there were any more examples. Using Google ('All Hail') Images I happened to come across the following brasses of:

Sir John Say (d. 1478) (Image here)

William de Grey (d. 1495) (Image here)

Sir Henry Greene (Image here)

All show a close-fitting short-sleeved tabard that reveals the tassets just as I had modelled Lord Dudley. I quite like the similarities with Say's life and that of Dudley but I will go into more detail on this when I finally post my epic Lord Dudley mini-series - only five years in the making so there's no rush.

Wednesday 20 May 2015

Modified WoTR Foot Men-at-Arms WIP, Perry Miniatures - Part 9 of 10

This figure dates back to when I initially parted this project around five years ago, which probably explains why it is only partially painted. I had difficulty remembering what exactly I had done to this figure but I eventually worked out that I chopped up the left arm to re-position it and added the feather plume to the sallet.

This figure could represent either Sir Edmund or Sir Oliver Sutton, sons of Lord Dudley. Edmund probably fought alongside his father at St Albans and Blore Heath (1459) while Oliver was killed at the Battle of Edgecote (1469).

Tuesday 19 May 2015

Modified WoTR Foot Men-at-Arms WIP, Perry Miniatures - Part 8 of 10

This is a basic figure and arms combo but with the head of poleaxe replacing the usual bill/halberd. I'm hoping the dodgy joint will be hidden by the future paint job.


Friday 15 May 2015

Modified WoTR Foot Men-at-Arms WIP, Perry Miniatures - Part 7 of 10

Greenstuff


After seeing previews of the latest Perry Miniatures release (light horsemen) I noticed that some of the riders had turn-down boots. I remembered seeing the same distinctive detail in an old Osprey book 'The Swiss at War 1300–1500' with illustrations by Gerry Embleton. 

With this figure I liked the resulting clean look using standard parts straight from the sprue but as my plan was to have as many unique miniatures as possible I realised a simple way to achieve this was to add the boot detail using greenstuff.
This figure was previously shown made up out of standard parts. I decided to add turn-down boots just to add a little variation to the overall look.
For this musician the turn-down boots effect was created once again with greenstuff. It's hard to see but I also cut away the knife from the left hand side of the figure and replaced it with a sword and buckler.
Just to be different instead of new boots this figure has been given a quick makeover with the simple addition of a head band made from greenstuff.

Thursday 14 May 2015

Modified WoTR Foot Men-at-Arms WIP, Perry Miniatures - Part 6 of 10

One of the more complicated figures I produced for this set, but similar in principle to the first one in this series. The original weapon from the right hand was removed and the arm/hand was cut away from a standard poleaxe piece.
Red circles indicate modified areas
The small crucifix was removed from the breastplate simply to change the look. It surprising how the eye will pick up on small details such as this when similar figures are placed next to each other. 
Red circles indicate modified areas
I was running out of similar left arm pieces so had to think up an option that worked for this particular arm. The remaining left arm piece is bent and sits tight against the body which isn't normally a natural pose for someone walking. However I thought I could make it appear the figure was resting his left hand on the sword pommel which now looks more relaxed. To achieve this the pommel of the sword had to be removed in order to enable the sword to fit into position.

Wednesday 13 May 2015

Modified WoTR Foot Men-at-Arms WIP, Perry Miniatures - Part 5 of 10

Not a modification as such, more of an addition. For this standard bearer figure I picked a sleeved right arm and realised it would be easier to add a sleeve made from greenstuff to the left arm rather than trying to remove or replace the detail from the right arm.Once this decision was made the rest was relatively easy to create. To give the impression that the figure is wearing a surcoat I removed all the plate detail from the front and back of the figure (view Post 4 to see the figure with an unaltered main body). 
Red circle indicate modified areas
Red circles indicate modified areas

Tuesday 12 May 2015

Modified WoTR Foot Men-at-Arms WIP, Perry Miniatures - Part 4 of 10

Another very simple modification to make, this time remodelling the figures left arm. As the standard left arm was originally intended to hold a polearm it crossed over in front the figure's body. Therefore this needed a relatively simple job of cutting the left arm into three parts, altering the angle of the upper arm and rotating the left hand outwards.
Red lines and circles indicate modified areas

Monday 11 May 2015

Modified WoTR Foot Men-at-Arms WIP, Perry Miniatures - Part 3 of 10

This is a slightly more complex alternation but using the both arms from the original weapon set. The original arm weapon combination comes as one piece (as shown below). It's quite difficult to describe how this was achieved but hopefully the photos will be of help.
Red lines and circles indicate modified areas
The left arm and sword were separated from the right arm and then the left hand was cut away and angled and rotated so that the sword rested against the figures left shoulder. The pommel was recreated using a small blob of greenstuff.

As the armour for the the in this set are so distinctive I used the right arm as well. The upper and lower right arm were both cut away so the the elbow would point backwards in a more natural looking position.
Red lines and circles indicate modified areas
After looking that the figure I decided the right arm didn't look quite right so I cut off the forearm and angled it downwards. The resulting gap was infilled using greenstuff.
The images below show a figure made up of unaltered parts straight off the sprue to show the difference. I have since altered the appearance of this figure as well but will detail that it in a later post.
Figure showing standard parts

Friday 8 May 2015

Modified WoTR Foot Men-at-Arms WIP, Perry Miniatures - Part 2 of 10

Weapon Switch

This small modification is probably one the easiest of all the examples shown in this series so if you're reluctant to modify a figure, with the thought of ruining it by hacking away with sharp instruments (it's never stopped me), then this may be the best option for your first attempt.

This mod simply involved removing the original weapon and replacing it with a warhammer which was taken from (if I remember properly) the mounted Men at Arms box set. As the original weapon was a sword it had quite a prominent pommel which I shaved down.
Red circle indicate modified areas
To secure the shaft of the warhammer (or similar weapon) you can sharpen the end on the shaft then bore a suitable small hole into the hand, using either a hand drill or a sharp scalpel, taking care to follow the line of the original weapon. Insert the shaft into the hole and then hopefully the replacement weapon will be less likely to break off.

The figure shown below has appeared before on this blog before and was part of the initial batch of figures I started (I managed to paint a grand total of two figures before getting distracted). As the original hammer had broken off this time I used a mace.

Yet another a simple modification for this standard bearer with the original weapon cut away and replaced by an axe taken from the Mounted men at arms box.
Red circle indicate modified areas
With the figure shown below I switched the head of the polearm from the original curved axehead. I also re-positioned the arms so that they would hang in a more natural looking way. The gap created at the back of the arms was filled in with greenstuff.


Thursday 7 May 2015

Modified WoTR Foot Men-at-Arms WIP, Perry Miniatures - Part 1 of 10

After visiting Leicester during the week of King Richard III's reburial I decided to focus my attention, for the time being, on my long neglected Wars of the Roses (WoTR) collection. I didn't quite realise that this project had been gathering dust for so long (over five years in fact) so it seemed an appropriate time to reduce this particular pile of boxed plastic. 

Michael Perry has done a pretty remarkable job of creating several sets of plastic miniatures that are both compatible and therefore very versatile. With the various weapon and helmets combinations you can produce dozens of figures and not have two alike. However saying that, I'm an awkward bugger in that I like to have truly individual figures and these plastic sets enable me to have just that. With a few modifications you can create for yourself a distinctive group of miniatures that are unique, something not really practical, although not impossible, with metal figures.

With the following mini-series I'm going to attempt to detail some the modifications and alterations I've made to produce a number of Foot Men-at-Arms units that feature of the increasingly popular Lion Rampant rules. Although not specificity written for the WoTR the rules are flexible enough to cover the period. The author, Dan Mersey, has even written extra rules and unit stats (to include handgonnes for example) that deal directly with any issues you may find if you are tempted to play the period.

In the rules a unit of Foot Men-at-Arms consists of six figures so I have attempted to create two units that are unique. Some of the resulting minis have very basic alterations whilst others required a bit more time and effort to achieve. All the figures detailed in this and the upcoming posts are taken from the Perry Miniatures plastic box sets namely:

Wars of the Roses Infantry 1455 - 1487
Mounted Men at Arms 1450 - 1500
Mercenaries European Infantry 1450 - 1500

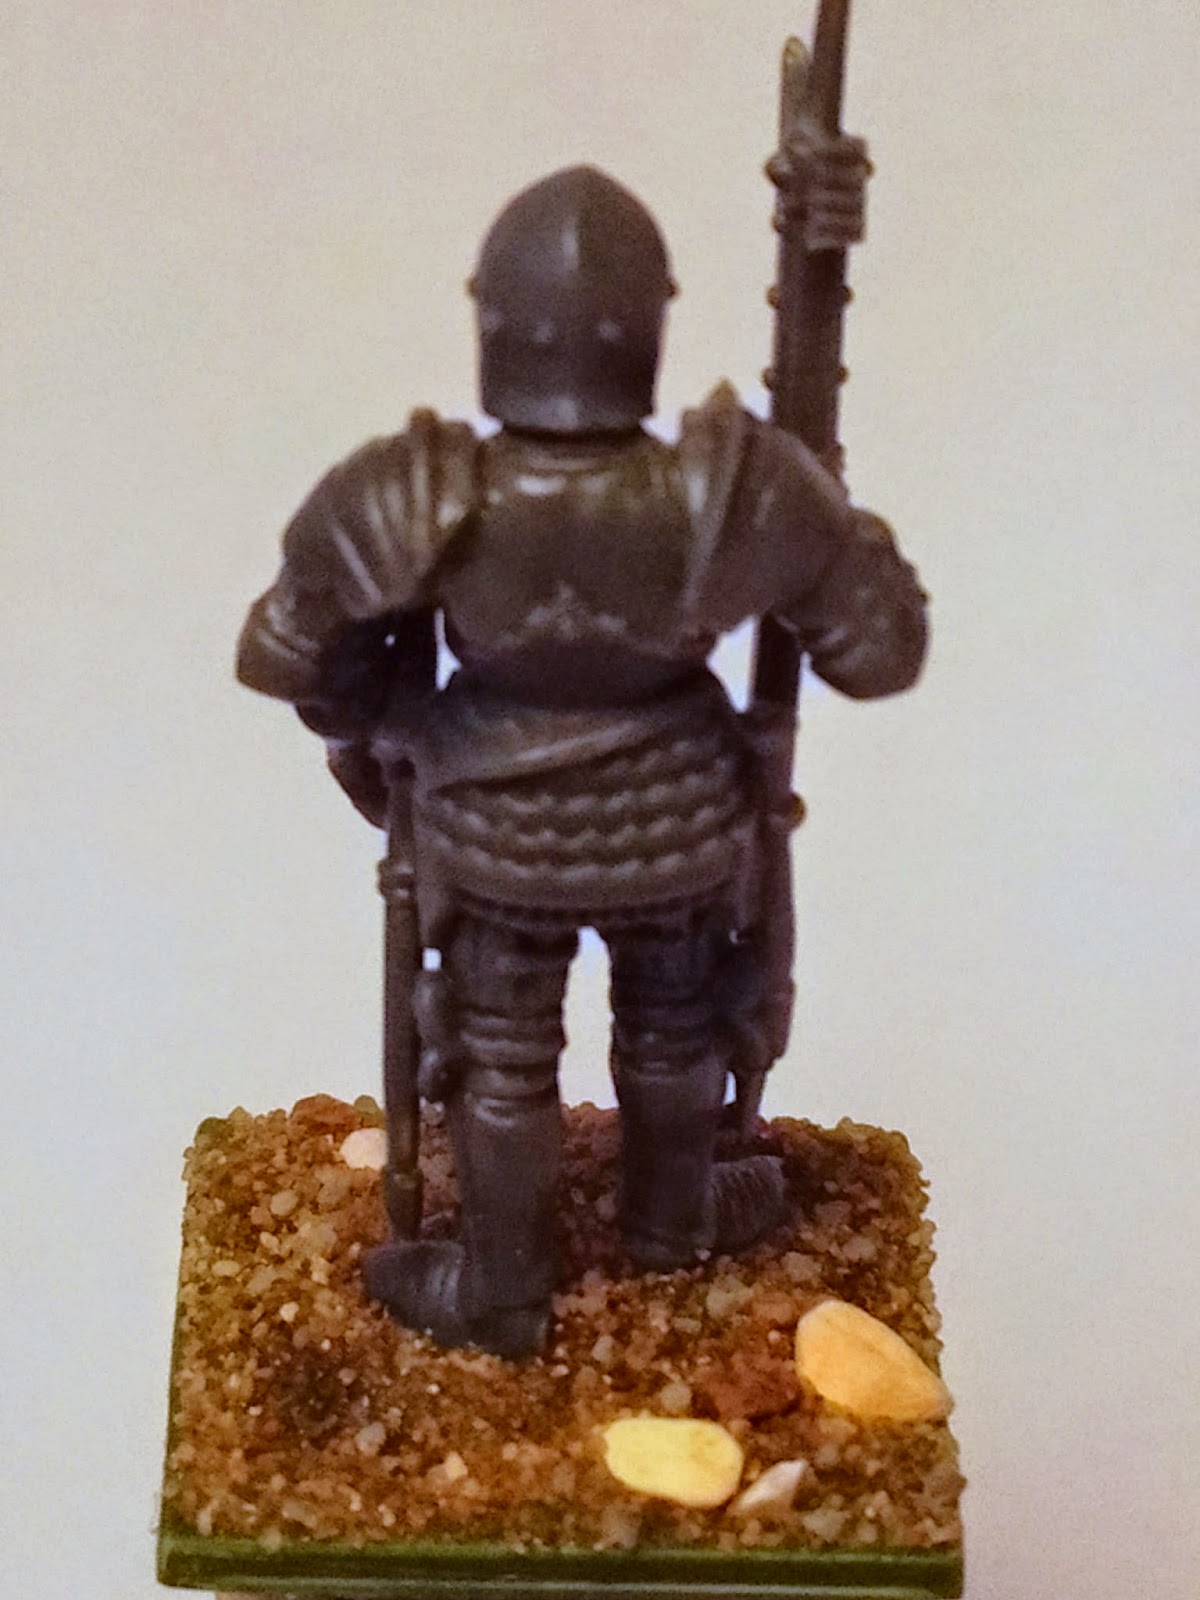
The figure detailed here is probably the most complex of the ones I've made for this mini-series as both arms have been chopped about and altered. You have to remember that the armour has to match both the left and right arms, which is also pointed out on the instruction leaflet. Although this may sound obvious it is easy to overlook this simple detail when you find a seemingly suitable looking arm and forget to check to see that the armour matches the other arm.
Red lines and circles indicate modified areas
I had the idea (or thought I had) of making this figure more distinctive after I had made a few pieces of battlefield debris including discarded helmets and weapons which will decorate the bases of my mounted knights, the helmets being hollowed out using drill bits and a scalpel. I had also previously spotted a bare head (helmet-less) and thought I could make a knight holding his sallet, giving the impression that he was having a bit of a breather. It's surprising to note just how many important knights and nobles received head injuries in battle during the medieval period, Lord Clifford 'the Butcher' being just one notable example and of course the future King Henry V received a arrow in the face at the Battle of Shrewsbury 1403.
Red lines and circles indicate modified areas
In order to achieve this look I took a right arm piece and removed the polearm. The right arm was then cut into three pieces so that I could align the arm properly, using Blu-Tac to hold the pieces in place to test out the best position. As the right arm is elevated slightly, to allow space for the helmet, this created a nasty gap under the armpit which had to filled with greenstuff. I used the same material to produce the fingers of the right hand which had been cut away with the weapon.
Red lines and circles indicate modified areas
The figure was now without a weapon so to rectify this I took a standard right arm, straight from the sprue, which was originally holding a poleaxe but this time I cut away the hand leaving just the staff. This was then glued to a suitable plain left arm piece. As the poleaxe crossed in front of the body I cut through the left forearm and rotated the left hand outwards.

I thought I was being clever making all these modifications to this figure until I found a metal Perry figure tucked away at the bottom of a storage box. As you can see it's almost exactly the same as my effort. Thinking about it, I had obviously bought this figure a while ago, mentally registered the nice design and then put it to one side, eventually forgetting that I had even bought it. When I made up my version I was unintentionally copying the original almost exactly.
Spot the difference.
With added besagues
After finding the Perry figure I noticed it had besagues (circular plates designed to protect the armpits). Seeing as my version was practically identical I decided to replicate that as well (in for a penny, in for a pound). This was achieved using small blobs of greenstuff and making the indentations with a metal scribe.

Wednesday 6 May 2015

City of Coventry Handgone Contingent, Perry Miniatures

These figures represent a small contingent of medieval handgonners equipped by the City of Coventry. These are the first complete unit I have finished for my Wars of the Roses (WoTR) project and which may seem an odd initial choice. Regular readers will already probably be aware of my rather haphazard approach to projects, my main focus will eventually be on Lord Dudley's retinue, but I had the chance to create a unit that was both interesting and had a local west midlands connection, something I try to achieve with as many of my projects as is practical. 
I've been visiting Coventry for a number of years and it has been interesting to note its redevelopment even over such a relative short time. The city is often overlooked in terms of history (the infamous 1940 Blitz is of course the notable exception) but it still contains a surprisingly fair number of medieval buildings which probably deserve a post of it's own. During the middle age Coventry was often used by the king as the main gathering point for the various local lords and nobles. One of the flashpoints of the feud between the Stafford's of Grafton and Harcourt families that occurred during the Wars of the Roses was triggered when the Stafford's were on their way to their Coventry townhouse/inn and ran in to the Harcourts. 
The idea to make this unit was partially inspired by a series of fascinating posts by Jim Hale (his blog can be found here) and one in particular detailing urban contingents (which can be seen here) which details the men and equipment supplied by the city of Coventry. The prime source of information for this period is the Coventry Leet Book which is available to download as a PDF (you can also see it 'in the flesh' in Coventry if you book an appointment). 
The Leet book is basically a record of the mayor and council's accounts throughout the middle ages. For the mid C15th it details such things as military equipment bought and upkeep of the town defenses. For instance we know that Coventry supplied soldiers for the King and they must have been archers as they were equipped with "bowes and arowes..." and they were..."jakked and saletted" i.e. provided with padded jacks and helmets (this will probably result in future contingent of Coventry archers for my collection). 

The Leet book also says that the city watch were provided with various forms of firearms so I used this as a excuse to give my particular group of handgonners a local flavour. 

It is probably more appropriate to say that these figures represent men wielding various forms of the matchlock arquebus (and an older style of handgonne). I couldn't resist having one to represent an older style handgonne so I whittled away most of the detail for a standard piece to make the simple barrel version of the early examples of handgonne. 
Handgone (left) & arquebus (right) 
I intentionally made the outfits of the figures more varied and colourful than I normally would for run of the mill soldiers because they represent a city militia i.e. they're are wearing their own clothes. The sashes are in the city's colours of red and green as it is recorded that the city bought cloth to make them a standard and bends, a heraldic term which would indicate a shoulder sash in the city's colours. I've modelled the sash from right shoulder to left hip as this in heraldry terms is proper and not sinister (in the opposite direction) which is from the Latin for left and usually indicated that the wearer was illegitimate. I've noted that it is also how military sashes are worn.

With the pavise patterns I deliberately made the designs similar but not identical as I wanted to portray that the decoration was not the result of a modern style standardised industrial process (such as printing) but were hand painted by various individuals. It's a small detail but one I think makes the figures more interesting. The 'elephant and castle' symbol has been in use by Coventry since at least 1441.
Elephant & Castle symbol, Coventry
The images shown above are both taken in the Holy Trinity church in Coventry, the only surviving medieval church left in the city centre. The original medieval cathedral, St. Mary's, was demolished after the Dissolution and very little remains to be seen above ground today. This should also not be confused with the blitz cathedral, St Michael's, This was originally only a parish church (made into a cathedral in 1918) built by the Earls of Chester which was destroyed as a result of German bombing in 1940.