Thursday 25 February 2016

Hold On Tight, Lion Rampant

I'm finally managing to get somewhat organised, blog-wise. These are a few doctored images of a game played between gaming chums Derek, George and myself a few weeks ago. The game was based on Scenario E: Hold On Tight (I think). The object was to reach the bridge as quickly as possible and hold it against the enemy. In this particular game this involved Derek and myself taking on George.
You may notice it took an eternity to get my forces into the game with Derek pushing on and reaching, and holding, the bridge first. It didn't help that my deployment decision was terrible, plus I was using my notoriously unlucky dice. Well...any dice I use seem to be unlucky.  


Derek and myself managed to hold of George's forces and gain enough glory points to secure the win. I had to stop myself from celebrating with a small victory dance as winning games is a habit I somehow haven't managed to develop. There's few things more annoying than a bad winner. The game took place at [Asgard Games Uk] in sunny Walsall, West Midlands.

If you want to see far better photos please pop over to George's page [Hrothgars shed blog] and read the proper game review.

Tuesday 16 February 2016

C16th & C17th Army Covered Supply Cart and Horse, 4Ground & Colonel Bills

As the title indicates these are a combination of models bought from Wargamer show held in Halesowen back in December. The draught horse is from Colonel Bills. Their website can be seen [Colonel Bills]. The cart is from 4Ground (Code: 28-CAW-309). Their website can be seen [4ground carts].
The model cart doesn't come with any covering but I thought this looked a bit odd. I had considered using tissue paper or kitchen roll but quickly realised this was either too thin or patterned. 

The owner, Vince, of the local gaming store [AsgardGamesUk] suggested using a wet wipe after seeing it mentioned by Mel [TheTerrainTutor] on YouTube. This proved to be perfect. The material is not too thick and so look out of scale but is strong enough to hold its shape after being painted. He even provided me with one to try.

After letting it dry out I placed the wipe over the model and marked the basic pattern out, remembering to allow enough extra material to allow it the droop between the ribs. 
The (dry)wipe was then superglued into position and then 'painted' with watered down PVA glue. Once dry the wipe/covering was painted to represent dirty, weathered canvas. I sanded the two shafts to knock off the sharp edges.

Since these photos were taken I've painted black straps onto the shafts to indicate that they are attached to the harness rather than just appearing to float as seen here. 
I've deliberately left off any figures so that I can use the set for different periods. I tend to use this set with The Pikeman's Lament rules. Scenarios involving protecting or raiding supply wagons are generally quite fun, especially if you can set 'fire' to them. I may even use it in a sneaky fashion in future games. Even if they are not used in play they still improve the look of the tabletop.

Wednesday 10 February 2016

ECW Casualty Markers, The Pikeman's Lament

These markers are used to keep track of individual losses for multi-based figures. whilst playing the (as yet to be released) 17th century skirmish ruleset from Osprey, The Pikeman's Lament. The modified figures are taken from the Warlord Games 'Firelock Storming Party' box set.

As I don't particularly like to depict the face of death (I prefer to put the emphaise on gaming when wargaming) I covered the face of one of the plastic 'causalities'. As making these bases are quite time consuming and uses up relatively costly figures, for future markers I will probably just produce simpler bases with the detritus of the battlefield.

A YouTube video of how I made similar markers (for Bolt Action pin markers) can be found [here].
I had previously relied on having loose individual dice to mark casualties but when die are being scattered across the tabletop it is very easy for these to get lost amongst the chaos. Using markers like this also then at least you have a decent chance of being able to keep track of things.
The co-author of the new The Pikeman's Lament rules, Dalauppror, has come up with an unusual basing system which can be used with the rules. Keeping true to the spirit of the original rules (i.e. newcomer friendly and flexible), this basing method doesn't have to be strictly adhered to, it's just a recommendation to aid game play. Details of Michael's method can be found [here].

It isn't a basing method that I'm going to use simply because a lot of my figures are already based in groups of four. If you're going to be using the core mechanics of the Lion Rampant system then it may be worth considering, especially so as I believe that this group of rules will be considered future classics of their type.

Tuesday 9 February 2016

Scratch Built Hedges & Fences

This post may be "stating the "bleedin' obvious" for most readers but hopefully someone will find it useful. In the past I have made a number of hedges using various techniques for my tabletop. Initially I used strips of foam board for the base with scouring pads stuck together with wood glue (PVA) and attached to the foam board with internal posts (made from barbeque sticks). All of this was sandwiched together with PVA wood glue which had to left, usually overnight, to dry properly. The bases were textured using the same technique I used for my figures using sand, grass and various pieces of flocking. The resulting sections look nice but they required quite a lot of work for what is a basic piece of terrain. With hindsight these were definitely over-worked.
Original time-consuming example.
During a moment tidying away various hobby tools a thought occurred to me, I was curious if I could speed up the process using a hot glue gun. After all if it could glue my fingers to the nearest loose object then a scouring pad shouldn't be a problem. I also had a number of wooden tongue depressors that had been lying about which happened to match the length of the scouring pads. 
All new time-saving example
To make similar hedges you will need the following (Blue Peter style):
  • Scourers - Wilko (large UK department store),
  • Wooden tongue depressors (available from most craft shops),
  • Hot glue gun,
Cut the scouring pad into two pieces (check the length of the pad matches the length of the wooden stick). An easy way to do this is to fold the pad in half length ways and with a large pair of scissors cut the pad in half along the fold. This will ensure that you have equal pieces with no need to mark or measure the scouring pad.

Fold one of these halves again length ways using the gun to stick the two sides together, the glue should set in a few seconds. Next glue the 'hedge' to the base. It really is that quick and simple.

You could use a small pair of scissors to trim the edges of the pad so that it has more natural looking finish but here I'm showing the very basic model.

For anyone tempted to make their own terrain this is probably the easiest and most practical pieces you can make for yourself. At an educated guess I reckon the materials used to make these hedges, in the form shown above, would work out to cost about 25-30p each. If made in batches then it should work out to take only a few minutes to make each one.

If you wish to improve these pieces you can do so very simply by adding sand (and flock if you're feeling fancy) to the base.

Using cheap poster paints you can drybrush the hedge to create light green/yellow highlights. 

Interesting Hedges in History No.01 (in a very occasional series) - The Great Hedge
The 'Great Hedge' that featured in the battle of Blore Heath (1459) was tall enough to conceal the waiting Lancastrian forces (but not tall enough to hide the glinting spear tips apparently). On a visit to the battle site it's interesting to see that this ancient hedge still exists and it's also possible to see how it played a roll in the battle. The hedge towered over me (and I'm around six feet tall).
Great Hedge, Blore Heath
One you've made enough hedges, or get bored of them, you can then try to make fences. I have seen online versions (it may even have been via Games Workshop) of these hedges that including a gateway. With plenty of coffee stirrers lying about I was interested if I could make a similar item for myself. The example shown below isn't made to any particular design.
Use the same method described earlier but obviously you will need to cut the hedge/scourer in half length ways as well. The fences were simply made with coffee stirrers and off-cuts glued together with PVA wood glue.

If and when I get round to making the next generation of hedges these might be rougher inm appearance with broken walls, fences and branches etc. but it will may be a while before that happens.

Thursday 4 February 2016

Clubman - Archer, Modified Warlord Games

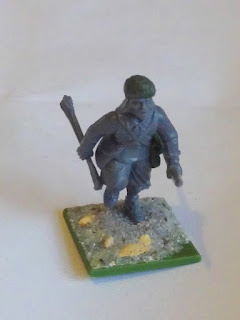
This is another modified plastic figure, taken the Warlord Games 'Firelock Storming Party' box set. Having read that the bow and arrows that were still being used occasionally on the battlefield during the wars I wanted to portray something completely different, hence this figure represents a 17th century archer.
As I didn't want to make or depict an entire unit of archers I thought it would be more interesting to make an individual clubman who came armed with bow and arrow(s). Given that he depicts a clubman I deliberately didn't want to give this model a quiver of arrows as I wanted to give the impression that he was probably a gamekeeper/poacher and not someone who had a dozen or more arrows at his disposal, more like someone who used a couple of arrows to hunt for food. To add to his individuality I gave him an extra bag and a woollen hat made from greenstuff. 
As with the clubman commander figure I cut away the belly box. Both arms are taken from the Perry's WotR plastic boxset.

Eagle-eyed readers may have spotted that I had forgotten to dot in the eyes before taking this photo. I normally add these using a technical pen. It's surprising the difference this tiny detail can made to the overall look of the model (no pun intended).

Wednesday 3 February 2016

Clubman Commander, Modified Warlord Games

This model is a modified plastic figure, the original taken the Warlord Games 'Firelock Storming Party' box set, which forms part of my ragged group of clubmen. I'm currently working similar models that will appear as dragoons but with this one I wanted a figure that would offer a degree of flexibility and so could represent a cavalry officer, dragoon, militia or, as titled above, a (rather well-to-do) clubman (any excuse to have a go at modifying plastic figure). The majority of the clubmen are standard, stock figures but I still detail them as and when I finish painting them.
This particular figure required a lot of cutting and carving, more than I initially envisaged. First the top half of the head was removed and then the sides of the head and face had to be narrowed in order for the distinctive helmet to fit. Anyone who has a box of Warlord Games plastic cavalry set will hopefully recognise the original part. If not then the top part of the lobster pot helmet consists of the crown and the face bars. The neck pieces (or the lobster tail, if you will) of the helmet and the hair were added with greenstuff.

The extended left arm was also taken from Warlord Games plastic cavalry set as was the carbine. So that the left and right arm matched I added a cuff, using greenstuff, to the left arm/hand. The carbine was a cut and shunt job. I chopped in half, well to be more accurate cut out a small section (the size of the model's hand) out and then glued the pieces either side of the left hand making sure that they aligned properly (unlike the first attempt seen in some of the original photos).

The small belly box was also cut away.

As the figure is obviously waving his sword around I removed the original sword hilt from the model.

The large turnovers on the boots were also created with greenstuff.